
▶ Space Couch Command CREW GUIDE // STATION
TACTICAL
Hold the lock and take an enemy apart one subsystem at a time.
You decide what the ship shoots at, and you pull the triggers — locking a target for the whole crew, then picking the right weapon for the range.
▶ YOUR CONSOLE
WHAT YOU CONTROL
Everything below is on your screen and nobody else's. If you do not say it out loud, it did not happen.
-
CONTROL
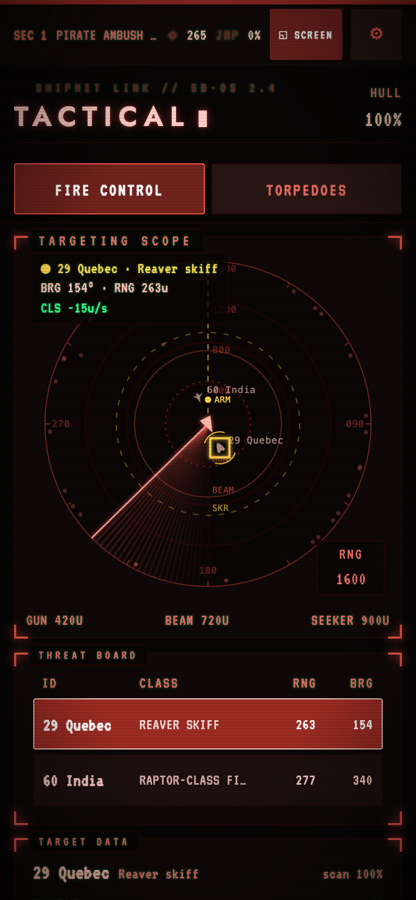
TARGETING SCOPE — a north-up radar disc centred on your own ship. Tap a contact to lock it. A button at bottom-right cycles the scope's reach between 800, 1600 and 3200 world units ("u"); rings mark beam reach (720u) and torpedo seeker reach (900u); a dashed amber ray shows the torpedo bearing you have dialled, with an ARM dot on it. Everything in flight — yours and theirs — is drawn live, and a torpedo that has locked YOU draws a dashed line straight at the centre.
-
CONTROL
THREAT BOARD — tappable rows (tap = lock, same as the scope) for every hostile ship, for mines that are visible (up to 6, with any mine that has woken and is hunting you sorted to the top), and for small storm debris inside beam range (up to 5). Each row shows range and bearing.
-
CONTROL
TARGET DATA + TARGET SCHEMATIC — under a lock: the enemy's shield and hull bars, how far Science has scanned it (%), and a wireframe of the enemy hull with a tappable node for each target point Science has located. Tap a node to aim there; tap bare hull to go back to hull shots. Nodes are labelled with a call-sign only (e.g. "22 Tango"), never "Engines".
-
CONTROL
BEAM BANKS (phasers) — one row per bank with a charge bar, a heat bar and a big FIRE button. A bank that has been handed to a Cannoneer shows a "⇢ cannoneer" tag instead of a button: that child fires it, at your lock.
-
CONTROL
MISSILE RACK — one FIRE MISSILE button that flies a homing dart at your current lock. Tapping repeatedly launches a volley (the server paces it).
-
CONTROL
ROCKET POD — an ARM ROCKETS button. While armed the whole scope frame turns amber and reads "ROCKETS ARMED — tap to fire": taps on the scope now FIRE at that bearing instead of locking. Running dry disarms it automatically.
-
CONTROL
TORPEDO ROOM — magazine counts, bearing steppers (−45 / −10 / +10 / +45), arm-delay steppers (±0.5s), and a row per tube: LOAD TORP / LOAD NOISE when empty, FIRE when loaded, a countdown bar while reloading. Plus an IN FLIGHT list naming every round in the air and its state, and a cyan FIRING SOLUTION button whenever Science pushes you a bearing and range (tap it to dial both in at once).
-
CONTROL
PD/HOLD: each gun turret has a real button that flips it between PD (armed, automatic point defense) and HOLD (powered down, shedding 12 units off the WEAPONS bus). STATUS-ONLY READOUTS you monitor but do not set: the four deflector arcs (allocation belongs to Engineering), the ordnance board (torpedoes / noisemakers / missiles / rockets), the railgun's stock and cycle timer (Helm's trigger), hull %, and the "◱ SCREEN" button that puts the tactical map on the TV.
▶ MOMENT TO MOMENT
THE LOOP
-
STEP 01
Read the board and pick one target. Tap it on the scope or the threat board — that one lock is what beams, missiles and Cannoneers all shoot at.
-
STEP 02
Say the call-sign out loud and ask Science to scan it. Class is identified at 35% scan; target points appear at 55%, 78% and 100%.
-
STEP 03
Ask Helm for the range you need. Beams only reach 720u and the FIRE buttons read "FAR" outside that; torpedoes and missiles reach much further.
-
STEP 04
Fire what fits the range: beams the moment they show FIRE, missiles at the lock, rockets by arming the pod and tapping a bearing, torpedoes down a dialled bearing with an arming delay.
-
STEP 05
Once the enemy's shield is flat, tap the target point Science named and keep hitting it — the overflow past the shield goes into that component instead of the hull.
-
STEP 06
Watch the IN FLIGHT list and the deflector strip. Answer inbound torpedoes with a noisemaker down their bearing, call for flares / ECM / evasive from Helm, and re-lock as things die (a destroyed target clears your lock automatically).
▶ THE RULES UNDERNEATH
KEY MECHANICS
The numbers here come straight out of the shipping build.
-
MECHANIC
The lock is the whole console
One contact at a time is "the target" (tap on the scope, or a threat-board row). Beams need it, missiles need it, Cannoneers fire at it, and sub-targeting hangs off it. Switching the lock silently resets your sub-target back to plain hull shots, so you must re-pick the component after every target change. Locking a fresh contact takes no time and costs nothing — but nobody else on the bridge can do it for you.
-
MECHANIC
Beams: short, certain, and hot
A phaser bank does 24 damage per shot at up to 720u and CANNOT miss inside that range — no dice roll for the player. Full recharge is 2.4 seconds at full weapons power, and each shot adds 30 heat to the bank (which bleeds off at 14/s and slows the next recharge by up to 60% while hot). Each shot also dumps 6 heat into the reactor core, which only cools at 2/s on its own — sustained beam fire is a problem Engineering has to vent. If Engineering is overclocking, beam damage doubles to 48.
-
MECHANIC
Sub-targeting: shield first, then the component
Damage always eats the enemy's shield before anything else; only the overflow reaches your chosen target point, and only if that point has been revealed by Science and is still online. Destroying a component knocks it out and tears 12 extra hull off the ship. The schematic shows call-signs only — Science's console is the one that says which call-sign is Engines, Shield Gen, Weapons or Jump Drive, so you have to ask.
-
MECHANIC
Torpedoes: slow, huge, and blind to friend or foe
A torpedo runs at 95 u/s — faster than anything afloat, since the quickest hostile is a 73 u/s swarm drone, though it is still the slowest round in the game, carries a 72-damage warhead, has 32 seconds of fuel (about 3040u of reach) and turns at 95°/s. Once armed it homes on the LOUDEST signature within 900u — and it has no IFF, so your own ship is a valid target. You dial a compass bearing and an arming delay of 0 to 20 seconds; arming distance is delay × 95u, and the console warns below 3 seconds ("may arm near own ship"). Tubes take 8 seconds to reload. Nothing can shoot a torpedo down.
-
MECHANIC
Noisemakers are the answer to torpedoes
Load a tube with NOISE instead of a torpedo and fire it down a bearing. Once it arms it screams at signature 400 — far louder than your ship (40 when parked, up to 165 at full burn with overclock and evasive) — and torpedoes re-pick the loudest source every single tick, so it steals fish off you. It stays loud for 24 seconds. It is symmetrical: it will steal YOUR torpedo too if it is anywhere near the run. Noisemakers cannot be restocked anywhere in the run.
-
MECHANIC
Missiles vs rockets
A missile costs one from the rack, flies at 260 u/s for 9 seconds (~2340u) and does 14 damage. It leaves the rail wild for 0.4s in a ±40° corkscrew, then chases the lock it was fired at, at 240°/s — it never re-targets, and if that ship dies the rest of the volley just flies straight and burns out. A rocket costs one from the pod, flies at 300 u/s for 4 seconds (1200u) for 10 damage, and only has a weak 45°/s nudge onto the first enemy inside 500u and within 30° of its nose. Missiles and rockets can both be shot down by point defense and lured onto decoys. A torpedo cannot be shot down by anything — but it can still be stolen by a decoy, which is exactly what noisemakers are for.
-
MECHANIC
Gun turrets are automatic — you only manage their power
You have no manual gun trigger. Turrets auto-engage inbound MISSILES and ROCKETS only, out to 340u, with a 45% chance per shot to delete the round, one shot roughly every 0.9 seconds (faster with more weapons power). They never engage torpedoes or railgun slugs. Your only control is PD (armed) vs HOLD (powered down), and any turret off HOLD adds 12 power units to the ship's WEAPONS demand — so HOLD is a real gift to Engineering when there is no ordnance in the air. Frigate has 1 turret, cruiser 2, dreadnought 3; the wren, cutter and corvette have none at all.
▶ DO THIS
TIPS FROM THE SIM
-
TIP
Use the FIRING SOLUTION button. When Science marks a plot, a cyan bar appears in the torpedo room with a bearing and range — one tap dials both the bearing AND a sensible arm delay (it works out to roughly (range − 120) ÷ 95 seconds, so the fish goes live about 120u short of the mark).
-
TIP
Kill the shield generator first on anything you intend to grind down: an enemy shield regenerates at 3/s for as long as that component lives, and every point of it has to be chewed through again before your sub-target shots land.
-
TIP
Kill the jump drive on anything that is running. A fleeing enemy spools an escape jump over 25 seconds and then vanishes with no bounty — knocking its drive offline freezes the spool exactly where it is. Raptor-class fighters have no drive fitted at all, so they can only run.
-
TIP
Two components destroyed usually buys a surrender instead of a fight. A corsair or reaver hails you to offer surrender the first time its hull drops under 60%, on a 40% roll; if it does not offer, Comms can force the conversation by hailing it under 25% hull, or under 60% with a subsystem destroyed — each destroyed component also rips 12 hull off, so focused fire walks them into that window fast. A surrender pays 25 salvage and ends the fight instantly.
-
TIP
Volley, then switch. A missile remembers the lock it was fired with, so you can dump three darts at one ship and immediately re-lock something else — the darts still chase the original. Just don't over-volley a nearly-dead ship: anything still in the air when it dies fizzles and is wasted.
-
TIP
Rocks are cover, for both sides. Torpedoes, missiles, rockets and rail slugs all detonate harmlessly against asteroids, derelicts, planets and wrecks. A big rock between you and a sniper is a real defence, and it also means a torpedo you fire past a boulder may never arrive.
-
TIP
Mines and storm debris die to a single phaser shot (a mine has 10 hull, a debris shard 18, a phaser does 24). A mine that has woken up runs at 58 u/s — faster than a TALON, VANGUARD, SOVEREIGN or COLOSSUS — so on those hulls shooting it is the counterplay rather than running. It sorts to the top of your threat board for exactly that reason.
▶ NOT THIS
COMMON MISTAKES
-
MISTAKE
Expecting point defense to save you from a torpedo. It never will — the guns are hard-coded to engage missiles and rockets only, and the railgun slug is uninterceptable too. Torpedoes are answered by a noisemaker (or by Helm's flare, weakly, for about 5 seconds); a rail slug is answered only by Helm dodging. Also note the scope's dashed "GUN" ring is drawn at 420u, which is NOT the point-defense envelope: auto-PD only reaches 340u.
-
MISTAKE
Popping a noisemaker while your own torpedo is still running. Your fish re-evaluates the loudest source in a 900u bubble every tick, and your noisemaker screams at 400 — so it will happily turn around and chase your own decoy. Fire fish first, decoys second, or place the decoy well off the run line.
-
MISTAKE
Launching a torpedo at a close target with a short arm delay. Torpedoes have no IFF and your own ship is a legitimate signature. The console warns below 3 seconds of delay for a reason: at 95 u/s, 3 seconds is only ~285u of dead run before the seeker wakes up looking for the loudest thing nearby, which at that distance can easily be you.
-
MISTAKE
Not noticing a WEAPONS outage. If a hack or a surge knocks the WEAPONS system offline, your beams, the missile rack, the rocket pod and PD all go dead — and the dedicated Tactical console does not grey out its buttons, so presses just do nothing. Torpedo tubes and Helm's railgun are mechanical and keep working. If FIRE stops producing beams, call Engineering and switch to tubes.
-
MISTAKE
Shooting a ship after it has surrendered. You have already been paid the 25-salvage bounty; finishing it off earns no kill salvage and costs 15 reputation with BOTH pirate factions, which makes future captains meaningfully less willing to offer surrender to your ship for the rest of the run.
▶ CROSS-STATION
WHO YOU TALK TO
No station wins alone. These are the conversations this seat owes the rest of the bridge.
-
TALK TO
Science
Science's scan is what turns a blip into a killable ship: class identified at 35% scan, target points located at 55%, 78% and 100%. Critically, only Science's console maps a call-sign to a function — your schematic shows "22 Tango", theirs shows "22 Tango — Shield Gen". Science also pushes you a FIRING SOLUTION (bearing + range) for blind torpedo shots. Say the lock's call-sign; ask for a scan; ask which node is which.
-
TALK TO
Helm
Helm owns range and facing, and your best weapon only reaches 720u. Helm also owns the flares (the only decoy that touches missiles AND, weakly, torpedoes), the ECM scrambler, the evasive maneuver, and the railgun trigger — you watch the railgun's stock and 6-second cycle timer on your own ordnance panel, so you are the one who calls "rail's cycling, beams on the frigate". Helm's throttle also sets how loud you are to torpedo seekers: base 40, plus up to 70 at full throttle, +35 while overclocked, +20 while evasive. "Fish in the water, cut throttle" is a Tactical call.
-
TALK TO
Engineering
Weapons power sets your beam recharge speed and your turrets' cycle rate; overclock doubles beam damage; venting clears both weapon heat and the reactor heat your phasers keep adding (6 per shot). Engineering also allocates the four deflector arcs you can see but not set, and clears a WEAPONS lockout with the REROUTE conduit puzzle, or waits out its 90-second expiry — there is no repair bench for WEAPONS. Ask for overclock before an alpha strike; call turrets to HOLD to hand 12 power units back when nothing is inbound.
-
TALK TO
Comms
Comms sets the alert posture, runs the hails, and handles the surrender offers your focused fire produces — so tell Comms when a target is in the surrender window rather than just killing it. Comms also jams enemy calls for reinforcements and watches enemy escape-jump charge, which tells you whether to spend a torpedo on a runner's drive.
-
TALK TO
Cannoneer (GUNNER seat)
Optional seats, sized for young crew, available on every hull. Each connected Cannoneer takes over one of your phaser banks (they take the rearmost first, so you keep the front banks) and fires it at YOUR lock — they have no targeting controls at all. On a two-beam ship with two Cannoneers you may have no FIRE button of your own left; your job becomes pure target selection, ordnance and calling the shots. Tell them what you have locked and when to hold fire.
▶ SMALL CREWS
ON A SMALLER SHIP
Tactical is a full dedicated seat only on the 4-crew frigate, 5-crew cruiser and 6-crew dreadnought. On the 3-crew corvette and 2-crew cutter it merges with Helm into the "Pilot-Gunner" console, and on the 1-crew wren it merges with everything into the "Shipmaster" console. On those merged seats the targeting scope disappears into the flight map: you tap contacts on the same map you fly with (and, with rockets armed, tap it to fire on a bearing). You keep beams, torpedo tubes with bearing and arm-delay steppers, the missile rack, the rocket pod, ordnance stocks, target data and the sub-target schematic. What you lose is the point-defense section entirely — the wren, cutter and corvette carry zero gun turrets, so there is nothing to switch between PD and HOLD, and Helm's flares (of which those hulls carry extra: 10, 8 and 9 respectively) are the ship's only point defense. Their weapon fit is also thinner: one beam bank on all three, one tube on the wren and two on the cutter and corvette, versus two banks and four tubes on a cruiser. Claiming Cannoneer seats materialises extra phaser banks beyond the hull's stock count — but each cannoneer takes a bank from the back of the list, so on a one-beam WREN, SPARROW or TALON the first cannoneer takes your only phaser.