
▶ Space Couch Command CREW GUIDE // STATION
COMMS
Talk, jam, eavesdrop — and remember who owes you.
You are the ship's voice and its ears: you talk to everyone out there, you smother their calls for backup, and you hear things nobody else on the bridge can hear — so you say them out loud.
▶ YOUR CONSOLE
WHAT YOU CONTROL
Everything below is on your screen and nobody else's. If you do not say it out loud, it did not happen.
-
CONTROL
CHANNEL BANK + HAIL button — one row per ship, hulk or beacon on the plot (enemies, friendlies and derelicts only; rocks and anomalies aren't hailable). There is no range limit; the little strength bar just reads weaker the farther away they are.
-
CONTROL
RESPONSE BUTTONS on an open hail, plus ✕ END TRANSMISSION. The server writes the options; you press them. Put the COMMS channel on the TV and the whole room sees the other captain full-screen — avatar, name, faction, the transmission typing out at 38 characters a second, the response timer and the option labels — but the buttons stay yours alone.
-
CONTROL
CONDITION lamps — GREEN / YELLOW / RED. This is the ship's posture and only you (and the story) can set it.
-
CONTROL
COUNTER-SIGNAL jammer — a canvas you drag with your finger/mouse to slide your jamming window across the radio band and hold it on the enemy's hopping carrier.
-
CONTROL
TUNE / DROP CHANNEL on "passive signals" — sources that transmit but never answer (anomalies, haunted hulks). You get a live waveform; the audio plays on the TV, not your phone.
-
CONTROL
SCREEN ROUTER — you are the TV operator. You can put the tactical map, the scan card, the comms channel or Helm's parascope on the big screen; every other officer can only push their own channel.
-
CONTROL
PROBE RADAR + ◉ PING (only while Science is running a probe mission) — a rotating sweep and a manual radar burst, plus a ⧉ screen button to put the sweep on the TV.
-
CONTROL
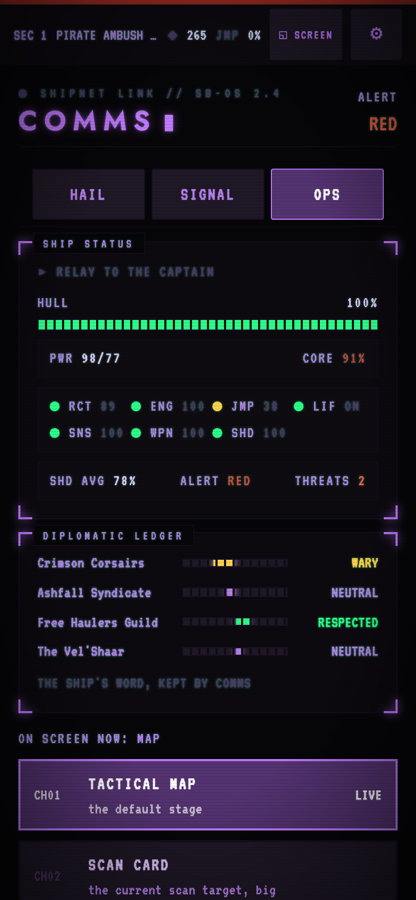
READ-ONLY panels you relay from: the SIGINT intercept feed, the DIPLOMATIC LEDGER, the SHIP STATUS readout (hull / power / core heat / seven systems / shield average / threat count), the ENEMY SIGNALS board, the SIGNAL SPECTRUM strip and the SYSTEM LOG.
▶ MOMENT TO MOMENT
THE LOOP
-
STEP 01
Sweep your own console: spectrum strip, SIGINT feed, enemy-signals board, channel bank. None of that reaches the TV, so anything you notice there only exists if you say it out loud. The hail theater is the one exception — that channel does go up on the big screen.
-
STEP 02
When a channel rings (or you open one), read the transmission out loud as it types in, then wait — the Captain decides, you press. The response window is long on purpose.
-
STEP 03
When a hostile uplink opens, drop everything: drag the jammer onto the bright carrier and stay glued to it until the window closes.
-
STEP 04
Set the condition lamp to match what you just learned, and put the right channel on the TV for whatever the room is about to do.
-
STEP 05
Between beats, read the ship-status panel to the Captain (hull, power vs demand, core heat, which systems are hurt) and glance at the ledger before you answer anyone.
▶ THE RULES UNDERNEATH
KEY MECHANICS
The numbers here come straight out of the shipping build.
-
MECHANIC
The hail — one channel at a time, silence is an answer
Their words type onto your screen at 38 characters per second and the response buttons stay hidden until the text finishes; then a countdown runs ("silence is an answer"). A pirate tribute demand gives you 120 seconds, an incoming mayday 100, a Vel'Shaar envoy 180, and a Guild merchant lingers 300 before she warps out. Letting the clock run fires that node's default: a pirate takes silence as a refusal and attacks. Hanging up on a live tribute demand is also a refusal and starts the fight immediately.
-
MECHANIC
The counter-signal duel (jamming reinforcements)
Roughly 45 seconds into a sector — then about every 180 seconds ±25% — the farthest eligible hostile opens a wide-band uplink for reinforcements. The window lasts 22 seconds. Their carrier jumps to a new frequency about every 2 seconds; you drag your jammer window onto it, and while you're inside a tolerance of 0.06 of the band your lock charges, outside it decays. The panel's BLOCKED number is your time-averaged lock across the whole window, and when it closes the odds are literally P(reinforcements) = 1 − blocked: hold 80% and only 20% of calls get through. A wave is 1 ship, +1 for every 3 sectors survived, capped at 3. Extra spikes on the spectrum are decoys and are never scored — only the brightest peak counts.
-
MECHANIC
Jammer reach depends on Engineering
The counter-signal only bites inside 7000 world units multiplied by the SENSORS power ratio (power granted ÷ power demanded, times sensor health; zero if sensors are offline). A fully-fed dish covers the whole playable area; a starved one can't touch a caller hanging back at the edge, and the board prints "⚠ SIGNAL OUT OF RANGE — caller beyond jammer reach — feed the SENSORS to extend it" instead of letting you chase air. Killing the caller, or driving it to flee or surrender, cuts the uplink dead with no roll at all.
-
MECHANIC
SIGINT — ears on the void
The server leaks real events onto a feed only comms consoles render: at most 4 rows live, each for 24 seconds, and the TV never shows them. Triggers are a coded burst about 15 seconds BEFORE an uplink opens (naming the ship winding up to dial), a runner's engine harmonics the moment she starts spooling an escape jump, a rail-gun capacitor whine when an artillery ship's rail is within 3 seconds of firing and in range, garbled husk chatter when the Unmaking front is high, and colony convoy pleas every 35 seconds during an evacuation.
-
MECHANIC
The diplomatic ledger — four factions, −100 to +100
Crimson Corsairs, Ashfall Syndicate, Free Haulers Guild and The Vel'Shaar. The ledger bands are hostile (≤ −60), wary (≤ −20), neutral (< 20), respected (< 60) and feared (60+); the positive end isn't friendship, it's fear. Paying tribute costs 8 corsair points AND makes them bolder — both the chance of a future demand and the size of the tribute scale by 1% for every point you sit below zero (base tribute is 30 + 8 × sector). Refusing a demand and then clearing the fight pays +5; a bluff that worked pays +12. Destroying a ship that has already struck its colors costs 15 points with BOTH pirate factions and makes fewer captains offer to surrender to you later. Guild standing rises +2 per honest purchase (capped at 6 per meeting), +3 for selling survey data, +8 for surviving a q-ship trap, +10 for a colony convoy that got away.
-
MECHANIC
Standing unlocks better sentences
At corsair standing ≥ 40 the tribute demand grows an extra option — "RUN OUR KEEL SIGNATURE. THEN DECIDE." — which scatters them 85% of the time, versus 50% for the "this is a Vanguard warship" bluff, and pays the same reward (half the encounter's normal payout). At Vel'Shaar standing ≥ 20 the kin-speech option appears on first contact without waiting for Science's scan. At Guild standing ≥ 25 the merchant gives you family rates (25% off) unasked.
-
MECHANIC
Surrenders, real and fake
Corsairs, reavers and the Basilisk artillery lance all yield when hailed while broken; fighters, drones, the envoy, the hunter and bosses never answer. Only corsairs and reavers ever hail YOU unprompted, once, the first time hull drops under 60% of maximum, at a 40% base chance. You can also force the conversation: hailing a pirate below 25% hull — or below 60% with a subsystem destroyed — opens the yield script instead of mockery. Accepting pays 25 salvage, counts as a kill, and leaves them adrift with weapons and engines dead. But 15% of yields from a ship still above 25% hull are fakes that spring an 18-damage point-blank strike when you accept; below 25% hull the fake roll can't happen. Choosing NO QUARTER means that ship never flees, never talks again, and fights to the last.
-
MECHANIC
Alert condition and the big screen
The three lamps have no direct effect on the simulation — they are the crew's shared posture signal. Setting one recolors every terminal's border, changes the TV's alert badge, plays an alarm on every console when it goes up, and switches the music (green = calm, yellow = alert, red = combat, and red in a hunter sector = the boss track). The story overrides you: the server slams RED when a fight starts and drops to GREEN when the sky clears. On the screen router you and the TV host are the only ones who can put ANY channel up; putting the COMMS channel up shows the whole conversation full-screen, read-only — the buttons stay on your console.
▶ DO THIS
TIPS FROM THE SIM
-
TIP
A tribute demand gives you two full minutes. That is a conference, not a panic — read the ledger, ask Engineering for the hold's salvage, and let the Captain decide before you touch a button.
-
TIP
If you're going to take a pirate's surrender, get them under 25% hull first. The fake-surrender roll only exists above that line, so a hail to a badly broken ship is a guaranteed 25 salvage and a free kill.
-
TIP
When the jammer prints OUT OF RANGE, stop dragging. Either shout for Tactical to kill the caller (that ends the uplink with no dice roll at all) or for Engineering to push power into SENSORS — your reach is literally 7000 units × the sensor power ratio.
-
TIP
Stall on first contact. Every second you keep the Vel'Shaar talking is scan time for Science, and the moment their scan crosses 0.35 a brand-new response option appears on your board mid-conversation. If you pick "SIGNAL: OUR GUNS GO COLD", the envoy really checks: every beam under 20% charge and every turret on HOLD, so clear it with Tactical BEFORE you press it.
-
TIP
Goading the hunter ("YOUR WALL DIES WITH YOU") is a 50/50 to make them spike their reactor, which hands Science a complete picture of the boss — identified, every subsystem revealed. There's no downside beyond a smug line.
-
TIP
Haggling with the Guild is a straight coin flip for 25% off everything. If the Guildmaster takes offense the channel closes, but she doesn't leave the sector — you can hail her again and the trade board comes back.
-
TIP
On merchant, first-contact and distress sectors the PEACEFUL ending is yours alone — say goodbye to the merchant, part with the envoy, or refuse the mayday, and the sector closes on your word. Each also has a violent ending Tactical can finish instead, so you are the only one who can close them out WITHOUT a fight.
-
TIP
Keeping a channel open with a ship stops that ship from being picked as the reinforcement caller — and killing a caller mid-uplink ends the call outright rather than merely blocking it.
▶ NOT THIS
COMMON MISTAKES
-
MISTAKE
Staring only at the hail panel. SIGINT rows expire after 24 seconds and never appear on the TV or on anyone else's console — a rail-charge warning you didn't read out is a warning that never happened.
-
MISTAKE
Paying tribute because it feels like the safe option. It pays zero reward, costs 8 corsair standing, and directly inflates both how often you get shaken down and how much they ask for next time.
-
MISTAKE
Answering the ring instantly. The buttons don't even render until the transmission finishes typing, and the windows (100–300 seconds) exist so the couch can argue about it — pressing first is throwing away the one mechanic that's genuinely a group decision.
-
MISTAKE
Chasing the pretty spikes in the jamming duel. Decoy peaks are pure decoration; only the single brightest carrier is scored, and every second off it decays your lock faster than holding it builds it.
-
MISTAKE
Letting the gunners keep shooting a ship that struck its colors. That's −15 with both pirate factions at once, and it measurably reduces how many future captains will offer to surrender to you.
-
MISTAKE
Pinging the probe radar because the map looks dark. The ping is the loudest thing the probe can do and the creature hears it — it reveals AND attracts, on an 18-second cooldown.
▶ CROSS-STATION
WHO YOU TALK TO
No station wins alone. These are the conversations this seat owes the rest of the bridge.
-
TALK TO
Captain (no seat — whoever is leading the couch)
Every hail choice is theirs to call. Your console is the only place the other captain's words exist, so you read the transmission aloud, name the options and their small print, and press what the Captain says. Same for the ship-status readout — overall ship state travels by your voice, not on the TV.
-
TALK TO
Tactical
They kill the reinforcement caller (which ends an uplink outright), they must hold fire on any hull that has surrendered, and the Vel'Shaar peace test checks their weapon charge and turret modes directly. You tell them who is spooling an escape jump and who has just been fully revealed by a goaded taunt.
-
TALK TO
Helm
Your SIGINT rows are aimed at them: the rail-capacitor whine literally says 'do NOT fly the line', and the enemy-signals board shows escape-jump spool percentages so Helm knows whether a runner is worth chasing.
-
TALK TO
Engineering
Your jammer's reach is a function of SENSORS power, so a starved dish silently caps how much of a call you can block. You also read the power-vs-demand and core-heat numbers off the ship-status panel that they act on.
-
TALK TO
Science
Their envoy scan crossing 0.35 unlocks your best first-contact option mid-conversation. They name what your bands can only label by family, and during a probe mission they fly blind while your radar sweep is the only thing that sees the creature — you call bearing and range to them.
▶ SMALL CREWS
ON A SMALLER SHIP
A dedicated Comms chair only exists on the 5-crew cruiser (SOVEREIGN) and the 6+ dreadnought (COLOSSUS). Everywhere else the duty is merged: the 4-crew frigate and 3-crew corvette fold it into a "Science & Comms" seat, the 2-crew cutter into "Operations" (Engineering + Science + Comms), and the 1-crew WREN into the single Shipmaster chair. On every one of those merged consoles the manual jamming duel is gone — an auto-jammer module holds a flat 25% blocked for the whole window instead, meaning 75% of reinforcement calls get through no matter what you do (a human chasing the carrier by hand can approach 100%, which is exactly why the dedicated seat is worth a body). The signal spectrum strip and the enemy-signals board are also dropped. What survives the merge: the SIGINT feed, the full hail channel and dialogue tree, the condition lamps, the ship-status readout, the diplomatic ledger, the screen router, the system log, and the probe radar with its PING.