
▶ Space Couch Command CREW GUIDE // STATION
ENGINEERING
Spend the reactor. Keep life support lit. Fix what breaks.
You run the ship's power company: one reactor that can never feed everything at once, plus the heat, the repairs, the deflectors and the life-support breaker that keep the crew alive.
▶ YOUR CONSOLE
WHAT YOU CONTROL
Everything below is on your screen and nobody else's. If you do not say it out loud, it did not happen.
-
CONTROL
POWER DISTRIBUTION rows — one draggable bar per system (Engines, Sensors, Jump drive, Shields, Weapons) that sets its priority from 0% to 100% in 5% steps; the bar's fill shows what the reactor actually granted, and the number reads granted/demand in units-per-second (u/s).
-
CONTROL
A ✂ BREAKER button on every row: one tap cuts that system to 0% (the button turns to a blinking OFF), a second tap restores the exact value you had before it.
-
CONTROL
OUTPUT / DEMAND / FREE readouts, plus a POWER FLUX oscilloscope that traces total demand against the reactor's output cap so an overdraw is visible as the line crossing the limit.
-
CONTROL
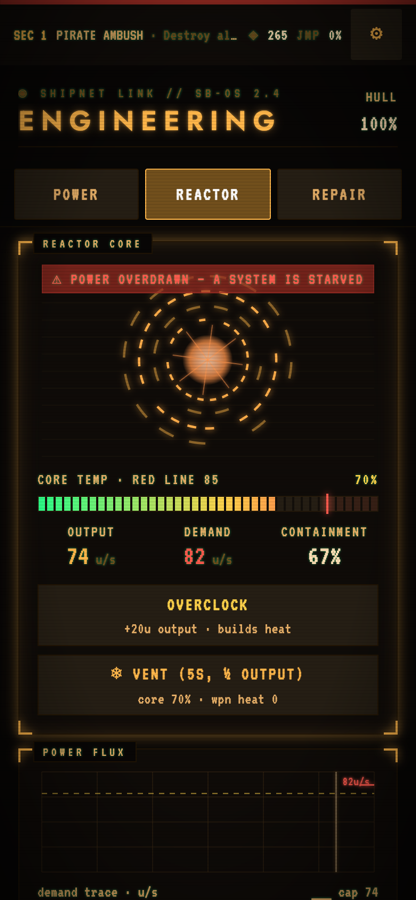
REACTOR CORE panel: core temperature bar with a marked red line at 85, OUTPUT / DEMAND / CONTAINMENT readouts, an OVERCLOCK toggle (+20 u/s output) and a VENT button (a 5-second cycle that halves output while it cools). A separate four-dial cluster — OUTPUT, CORE TEMP, WPN HEAT, CONTAIN — lives on the Repair tab, not this one.
-
CONTROL
LIFE SUPPORT breaker (ON/OFF only — no dial) sitting next to the RADIATION SHIELDING percentage, which is the crew's actual health bar.
-
CONTROL
SHIELD ALLOCATION — four sliders, one per arc (Fore, Aft, Port, Stbd), each showing that arc's current charge out of 200. This is Engineering's job, not Tactical's.
-
CONTROL
JUMP DRIVE spool toggle and charge percentage — you build the charge, Helm fires it.
-
CONTROL
DAMAGE CONTROL — a tappable ship schematic (tap a node to jump to that system's power row), the salvage counter, a HULL repair button and a worst-first repair queue; plus the REROUTE conduit puzzle, which only appears on screen when an event has forced a system offline.
▶ MOMENT TO MOMENT
THE LOOP
-
STEP 01
Read the one number that matters: FREE (or a blinking OVER) at the top of POWER DISTRIBUTION. That is your entire budget, already counting life support and any running repair.
-
STEP 02
Set the sliders for what the ship is doing this minute — fighting, running, scanning, or spooling a jump. Remember a system's draw is its demand multiplied by your priority.
-
STEP 03
Scan for red: any row flashing NOT ENOUGH POWER got nothing at all. Free at least that many units by lowering or cutting a different slider — the reactor will never rebalance itself for you.
-
STEP 04
Watch core temperature and the four arc charges. Vent before the core reaches 85; raise arc allocation to refill deflectors between volleys.
-
STEP 05
In the quiet: spend salvage on hull and reactor repairs, then spool the jump drive once the sector objective is done.
-
STEP 06
Say it out loud. Nobody else can see your board — announce what you just took away, what you just gave, and how hot the core is.
▶ THE RULES UNDERNEATH
KEY MECHANICS
The numbers here come straight out of the shipping build.
-
MECHANIC
Draw = demand × priority, and funding is all-or-nothing
Your slider is a percentage of a system's full appetite, not a rank. The reactor then funds systems in a fixed internal order — Engines, Sensors, Shields, Weapons, Jump drive, and finally the repair crew — giving each one its whole requested draw or nothing at all. There is no partial trickle and nothing already funded is ever clawed back to make room. Example: with 100 u/s of output and life support taking 10, a 70 u/s weapons load leaves 20 free, so a 30 u/s jump spool gets exactly zero until you dial weapons down.
-
MECHANIC
The reactor's heat loop
Core heat runs 0–100 with a red line at 85. Overclocking adds 6 heat/second, a jump drive parked at 100% charge adds 8/second, every phaser shot adds 6, and every point of damage your shields absorb adds 0.45. You passively shed only 2/second, and only while overclock is off. Past 85 the core damages itself at 2.5 reactor-hp/second, rising to 5 at heat 100. VENT is your only fast fix: a deliberate 5-second cycle that sheds 20 heat/second — enough to clear a full 100 in one cycle — while halving reactor output the whole time.
-
MECHANIC
Containment is output
Reactor output equals the hull class's rating multiplied by the reactor's integrity, plus any overclock bonus. Class ratings run from 70 (the 1-crew WREN) through 100 (frigate), 110 (cruiser) to 125 (dreadnought). So a reactor cooked down to 50% integrity gives you half the power for the rest of the sector until you repair it. Heat damage is the main thing in the game that hurts a system's integrity — everything else lands on the hull.
-
MECHANIC
Overclock is a war footing, not a trickle
While lit it adds 20 u/s of output, doubles engine speed, doubles phaser damage and doubles shield regeneration. The costs are real: 6 heat/second with no passive cooling to offset it (about 14 seconds from a cold core to the red line), and +35 to the ship's signature, which makes you far easier for hostile torpedo seekers to find. It is a tool you switch on for a specific 10 seconds and then switch off.
-
MECHANIC
Shield arcs: allocation buys regeneration, not armour
Each arc holds up to 200 charge and soaks damage from the direction it faces before the hull takes any. Your slider does not make an arc tougher — it sets how fast that arc knits back up (4.5/second per arc at 100% allocation and full SHIELDS power) and how much the SHIELDS system demands: 10 u/s per arc at 100%, up to 40 u/s for all four. The default 25% on every arc only draws 10 u/s total and regenerates each arc at about 1.1/second.
-
MECHANIC
Life support is a breaker, and radiation shielding is the crew
Life support has no slider and cannot be damaged or repaired — it is on or off. Closed, it reserves 10 u/s off the top of the budget and regenerates RADIATION SHIELDING at 0.8%/second toward 100. Open (or starved by a nearly-dead reactor), shielding bleeds at 4%/second. Outside the sector's safe radius the radiation fence burns roughly another 4%/second, more the deeper you drift. Shielding reaching 0 ends the run on the spot — all hands lost.
-
MECHANIC
Forced outages and the REROUTE puzzle
Roughly every 100–150 seconds from sector 2 onward, an intrusion or surge can scram one of WEAPONS, SHIELDS, SENSORS or JUMP DRIVE to LOCKED OUT. Power priority cannot fix it — a red banner and an alarm point you at the REROUTE conduit board, where you rotate tiles to link SRC on the left to the system tap on the right. Twelve seconds of connected flow restores it; break the link and progress bleeds back. An unfixed lockout decays on its own after about 90 seconds, so it is never a permanent softlock — just a very bad 90 seconds.
▶ DO THIS
TIPS FROM THE SIM
-
TIP
Your board's row order is not the funding order. The reactor pays Engines, Sensors, Shields, Weapons, then the jump drive, then the repair crew. Because funding is all-or-nothing, a big system that doesn't fit gets skipped while a smaller one behind it still lights up — so scarcity produces odd-looking results, not a smooth brownout.
-
TIP
Keeping all four arcs at or above 100 charge (half of the 200 maximum) makes the surge director ground 80% of its outage rolls harmlessly. Full deflectors are literally the cheapest way to avoid ever seeing the REROUTE puzzle.
-
TIP
Never park a fully charged jump drive. At 100% the capacitor bleeds 8 heat/second into the core — about 15 seconds from cold to the red line — and toggling the spool switch off does not stop it. Jump, or ride the vent through it.
-
TIP
Cutting ENGINES to zero does more than slow the ship: the throttle lever itself unwinds at 0.3 per second, all the way to a dead stop, and Helm has to push it back up manually once you restore power. Tell them before you cut.
-
TIP
A vent halves your output for the full five seconds. Venting in the middle of a barrage can starve the exact shields you were protecting — take the cooldown in the gaps, not at the peak.
-
TIP
The vent also flushes weapon and turret heat at 20/second. If Tactical says their phasers are heat-choked, your vent button is their fix.
-
TIP
SENSORS is not only Science's slider. Scan speed and scan range both scale directly off it (a zero-power dish reads nothing at all), Helm's ECM scrambler needs the sensors at 40% or better to work, and Comms' jamming reach scales off it too. Cutting sensors quietly disables three other people's tools.
-
TIP
Hull patches heal at half the rate of system repairs, and every repair bills 0.25 salvage per hit point — so a 100-point repair costs 25 salvage whether it takes 11 seconds or a minute.
▶ NOT THIS
COMMON MISTAKES
-
MISTAKE
Leaving every slider at 100% and assuming it works. Full-tilt demand exceeds every hull's output, so the distributor silently drops whichever system lands last — usually the jump spool or your own repair crew — and you don't notice until something flashes NOT ENOUGH POWER at the worst moment.
-
MISTAKE
Switching on overclock and forgetting it. Six heat per second with no passive cooling means the core crosses the red line in about fourteen seconds, then starts eating its own integrity — and because output scales with integrity, you lose power exactly when you are trying to add it.
-
MISTAKE
Opening the life-support breaker to free up 10 units. Radiation shielding then falls 4% per second with no hull damage to warn you, and it only claws back at 0.8% per second. Hit zero and the run is over instantly.
-
MISTAKE
Fighting a whole engagement with all four arcs at the default 25%. Your shields draw only 10 of a possible 40 u/s, each arc refills at about one point per second, and you forfeit the full-envelope effect that grounds most surge outages.
-
MISTAKE
Starting a repair mid-fight. Repairs draw 15 u/s and are funded dead last, so they either accomplish nothing or eat the exact headroom your jump spool needed — while burning finite salvage.
-
MISTAKE
Working in silence. Engineering's board never reaches the TV at all — there is no ◱ SCREEN button on your console, and no channel for it on Comms' screen router either. Ship status travels by voice, which is why Comms carries a read-only SHIP STATUS panel. If you cut something and don't say so, the station that lost it will think it's broken.
▶ CROSS-STATION
WHO YOU TALK TO
No station wins alone. These are the conversations this seat owes the rest of the bridge.
-
TALK TO
Helm
Engine power caps their speed, and cutting it unwinds their throttle lever to zero. Their evasive maneuver multiplies engine demand by 1.6. You spool the jump drive; only they can engage it. When your radiation shielding starts burning, they are the ones who have to fly back inside the sector envelope. Their ECM scrambler also needs SENSORS funded to at least 40%.
-
TALK TO
Tactical
Weapons power sets phaser charge speed and point-defense turret cadence, and every phaser shot they take dumps 6 heat into your core. You own the four shield arcs they rely on. Turrets left off HOLD add 12 u/s to the weapons load — ask them to hold the guns if you need the units back.
-
TALK TO
Science
Both scan speed and scan range scale straight off your SENSORS slider — a zero-power dish reads nothing and a half-fed one only reaches half as far. Active scanning costs 15 u/s versus 5 idle, so tell them when you can't afford the dish.
-
TALK TO
Comms
The jammer's reach scales with SENSORS power, so their counter-signal duel is partly your budget. They (or the host) are also the only ones who can put the ENGINEERING systems board on the main screen for the room to see.
-
TALK TO
Captain (a person on the couch, not a seat)
When demand exceeds supply somebody has to decide who goes dark. Report output, free power, core temperature and shielding percentage; the captain arbitrates the humans while you arbitrate the watts.
▶ SMALL CREWS
ON A SMALLER SHIP
On the 1-crew WREN (the Shipmaster's single console) and the 2-crew SPARROW (the Operations seat, which merges Engineering with Science and Comms), Engineering runs as a slimmed module with auto-officers covering what's dropped. You keep the priority sliders and breakers, the jump spool, the life-support breaker and the full REROUTE puzzle. You lose the overclock button (the server rejects the intent entirely on those hulls) and the manual repair console: an auto-repair module engages the worst bench once it drops below 80% integrity and repairs it to 100% at a quarter of the normal rate — 2.25 hit points per second — still spending salvage and still stalling when you're broke. An auto-vent trips automatically once core heat passes 90, so venting is no longer a decision you make. The four shield arcs collapse into a single deflector dial that sets all four equally. From the 3-crew TALON upward there is a dedicated Engineering seat with the full three-column bench (Repair, Reactor, Power — three tabs on a phone).