
▶ Space Couch Command CREW GUIDE // STATION
HELM
Fly the ship, point the nose, press the button that leaves the system.
You are the pilot: you point the ship, set its speed, dodge what is trying to hit you, fire the one gun bolted to the nose, and press the button that leaves the star system.
▶ YOUR CONSOLE
WHAT YOU CONTROL
Everything below is on your screen and nobody else's. If you do not say it out loud, it did not happen.
-
CONTROL
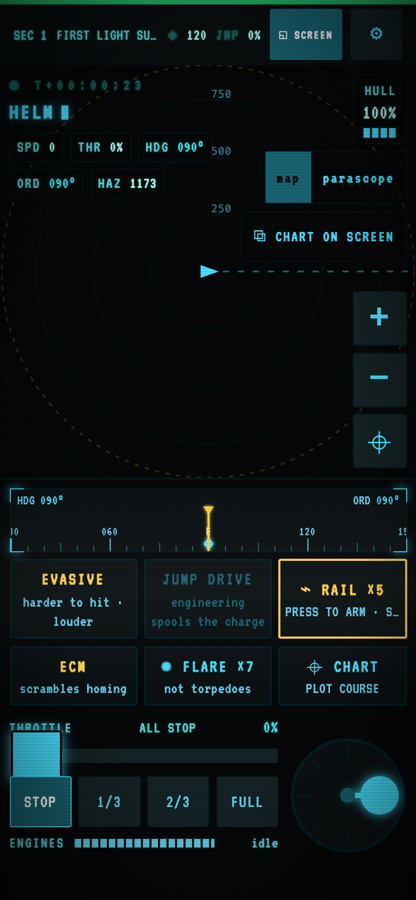
THROTTLE: a 0–100% slider with four preset buttons (STOP, 1/3, 2/3, FULL) and a naval readout ("ALL STOP" / "AHEAD 1/3" / "AHEAD 2/3" / "AHEAD FULL"), plus an ENGINES bar underneath showing how much of the thrust you ordered is actually being funded with power (it turns red and says "power-starved" when it isn't).
-
CONTROL
HEADING DIAL: drag to order a course. Above it a compass tape shows the actual bow (amber line, fixed at center), your ordered course (cyan diamond sliding along the tape), the shrinking gap between them with your hull's turn rate printed (">> 42° @ 55°/s >>"), and a green circle marking the direction you are really drifting.
-
CONTROL
VIEW toggle — MAP or PARASCOPE. MAP is a top-down follow camera with a dashed projected-course line, range rings every 250 units, a faint 900-unit torpedo-seeker ring, the dashed red radiation boundary and zoom buttons. PARASCOPE is a look-out-the-window view you can fly from: A/D or on-screen ◄ ► steer, W/S or ▲ ▼ ramp the throttle, drag to glance around (up to ±60° up/down), R or a chip to re-center, plus FREE-LOOK and (on phones) GYRO chips.
-
CONTROL
EVASIVE toggle ("harder to hit · louder") and ENGAGE JUMP, which only lights when the jump drive is charged to 100% and is not in a forced lockout from an intrusion or surge — the button then reads “drive locked out — reroute power” and Engineering has to run the conduit puzzle. Ordinary battle damage does not block the jump; it only slows the spool. Otherwise it shows the charge bar Engineering is filling.
-
CONTROL
RAIL slab: your railgun. Shows slug count (×2 to ×6 depending on hull) and a 6-second recharge bar. On the map it is press-to-arm then press-to-fire; in the parascope the slab arms it and you pull the trigger from the view (Space, a clean tap on the picture, or the round FIRE RAIL button).
-
CONTROL
ECM toggle ("scrambles homing") and FLARE button with its remaining charge count.
-
CONTROL
CHART: a slide-over star map of the whole run. Tap a system linked to the one you're in to lock it as your jump destination (tap again to release), see which systems are charted, which are unexplored frontiers with signals, and which are tagged "⚠ DEBRIS". It repeats the destination, jump charge and ENGAGE JUMP at the bottom.
-
CONTROL
Glance readouts over the map: speed, throttle %, bow heading vs ordered heading (amber = still turning, cyan = on course), distance to the nearest hazard (with a ⚠ mine label), hull %, and the mission clock. Two "⧉ on screen" buttons push your parascope view or your chart to the TV. A red pulsing banner + looping alarm warns of a collision course with a countdown; a second banner warns you are in the radiation zone.
▶ MOMENT TO MOMENT
THE LOOP
-
STEP 01
Arrive: after every jump the ship sits at rest in the middle of the new system with throttle zero and the rudder centered. Read the objective, pick a bearing, open the throttle.
-
STEP 02
Fly the crew to their work: Science can only scan inside 900 units, Tactical's beams reach 720 and the turrets 420 — Comms is the exception, with no range gate at all. Get close to what matters without touching rocks, waking mines, or drifting past 3,400 units from system center into the radiation fence.
-
STEP 03
When shooting starts, keep moving and keep the shield arc you want facing the shooter (the arc is decided by which way the bow points). Turn EVASIVE on, and answer inbound homing rounds with flares, ECM, or a hard turn.
-
STEP 04
Take rail shots when the line is clean: swing the bow onto the target, watch for SPINAL LOCK in the parascope, arm, fire, then get off that heading before the 6-second recharge ends.
-
STEP 05
Once the objective is complete and Engineering reports the jump at 100%, punch ENGAGE JUMP promptly — a fully charged drive cooks the reactor while you hold it.
▶ THE RULES UNDERNEATH
KEY MECHANICS
The numbers here come straight out of the shipping build.
-
MECHANIC
You order a course; the ship answers slowly
The dial does not turn the ship — it sets an ordered heading, and the bow swings toward it at your hull's fixed turn rate: 130°/s on the WREN, 110 SPARROW, 90 TALON, 70 VANGUARD, 55 SOVEREIGN, 38 COLOSSUS. That means a SOVEREIGN needs over three seconds to reverse course and a COLOSSUS nearly five. On top of that, velocity only eases toward the new direction (a base rate of 0.55 per second, scaled by hull), so the ship keeps sliding the old way after the bow has come round — that drift is what the green flight-path circle on the compass tape is showing you.
-
MECHANIC
Throttle is a request the reactor has to pay for
Top speed is 50 units/sec times your hull multiplier: 67.5 on the WREN down to 37.5 on the COLOSSUS. Real thrust = your throttle × how much of the ENGINES power demand Engineering actually funded × engine health, so a starved or damaged drive makes the lever lie (the ENGINES bar under the slider is the truth). If ENGINES goes offline or gets zero power, the drive UNSPOOLS: your throttle physically decays at 0.3 per second — full to dead stop in about 3.3 seconds — and you must push the lever back up once power returns. When Engineering OVERCLOCKS the reactor, engine output doubles: a SOVEREIGN goes from 45 to 90 units/sec.
-
MECHANIC
Speed is noise (signature), and EVASIVE is a trade
Enemy torpedoes home on the loudest thing nearby, scored as signature ÷ distance², with no friend-or-foe check. Your signature is 40 at rest, plus up to 70 more from throttle (so 110 at full burn), plus 20 while evasive, plus 35 while the reactor is overclocked, plus 15 while ECM transmits. EVASIVE halves an enemy's chance to land direct beam fire (a ×0.5 multiplier on their hit roll) but raises engine power demand by 60% and makes you louder — it does nothing at all against torpedoes, mines, rams or the railgun.
-
MECHANIC
Solid space: rams, mines, and the fence
Any impact bills 4 + 0.72 × closing speed × mass ratio, where mass is radius² and the ratio is clamped between 0.75 and 1.15 for ordinary bodies but jumps to 2.6 against planets and megastructures (roughly 97 damage from a full-speed 50 u/s hit — planets do not notice, you do); under 15 u/s of closing speed it's a harmless scrape, and both you and the other ship pay. Inside a DEBRIS STORM system rock impacts hit 2.25× harder and a big rock reaching the hull knocks a ship system offline. Mines sit quiet until you come within 160 units, then chase at 58 u/s — faster than a TALON (55), VANGUARD (50), SOVEREIGN (45) or COLOSSUS (37.5), so on those hulls shooting them is the counter rather than running; only the WREN (67.5) and SPARROW (62.5) can outrun one. Past 3,400 units from system center you're in the radiation fence: the crew's radiation shielding drains 4 per second at the line, and another 4 per second for every 1,000 units deeper. It never touches the hull directly — but if shielding reaches zero the run ends.
-
MECHANIC
The railgun: your gun, aimed by steering
A forward-fixed slug fired along the ACTUAL bow at the instant you pull the trigger (not your ordered course), so a turning ship throws the shot. It does 120 damage at 420 units/sec with 7 seconds of flight (roughly 2,940 units of reach) and a 6-second recharge; hulls carry 2–6 slugs, and a trader will sell two more for 60 salvage. Nothing counters it except dodging — point defense ignores it and decoys don't touch it — which is also why it still works when the weapons bus is knocked out. But rocks, hulks and planets block it, and it damages any ship it touches, including the freighter you were sent to protect.
-
MECHANIC
Flares and ECM
Flares are finite (6–10 depending on hull, with no way to restock mid-run) — they eject behind you, light 0.15 seconds later and burn for 5 seconds. Enemy missiles and rockets are strongly lured onto them and detonate against them within 80 units; torpedoes can also be pulled by the flare's 200 signature, though a Tactical noisemaker at 400 is still the proper answer to a torpedo. ECM scrambles the seekers of hostile torpedoes and missiles within 700 units (periodic heading kicks of up to ±12°), but only while SENSORS is online and funded to at least 40% — and it adds 15 to your own signature the whole time it transmits.
-
MECHANIC
The jump drive and the chart
Engineering spools the drive (18 seconds at full power); only you can fire it, and only at 100% charge with the drive not locked out. Once it's full it bleeds +8 reactor heat per second until you use it, so a "banked" jump is actively hurting the ship. You may jump mid-combat, but leaving before the objective completes logs "objective abandoned" and forfeits that sector's salvage reward. On the chart you can lock any system connected to yours by a lane (or through a charted wormhole) as the destination; with no lock, the jump takes a random connected lane.
▶ DO THIS
TIPS FROM THE SIM
-
TIP
Fly the flight-path marker, not the bow. Because velocity lags your turn, the green circle on the compass tape is where you're actually going — when you're threading rocks or breaking off from a ram, that marker clears the obstacle several seconds before the nose does.
-
TIP
Cutting the throttle is a defensive move. Going from full to stop takes your signature from 110 to 40, and since seekers score loudness ÷ distance², a quiet ship at range can lose a torpedo to a flare or a noisemaker that it would otherwise ignore.
-
TIP
Never fire flares while your own torpedoes are running. The torpedo seeker re-picks the loudest source every tick and has no friend-or-foe filter, so your own 200-signature flare can steal your own fish.
-
TIP
ECM is dead weight unless SENSORS is funded to 40% — and that's the same bus Science needs for scanning. Ask Engineering before you switch it on, and turn it off when nothing is homing on you, because it makes you louder.
-
TIP
Ask for OVERCLOCK when you need to close or break off. Doubling engine output is the only thing that makes your ship genuinely fast; a corsair does 67 u/s, faster than every hull except the WREN (67.5), and a raptor's 58 beats the VANGUARD, SOVEREIGN and COLOSSUS.
-
TIP
The parascope prints "SPINAL LOCK — <name> <range>u" when a live enemy is within about 8° of the bow. That is your rail cue, and it reads off the real server state — but the shot leaves along the bow whether or not the lock is showing, so a clean bearing matters more than the label.
-
TIP
Punch the jump the moment it reads 100%. Beyond the +8/sec reactor heat it costs to hold, every jump also advances the late-run Unmaking front by 8–12 points, so wandering the chart is not free.
▶ NOT THIS
COMMON MISTAKES
-
MISTAKE
Steering as if the dial turns the ship. You are ordering a course that the hull answers at 38–130°/s while still coasting on old velocity — new pilots overshoot into a rock, then over-correct into the next one. Watch the slew arc on the tape and start the turn early.
-
MISTAKE
Cruising at FULL all the time. Full throttle is maximum torpedo bait (signature 110 vs 40), one of the heaviest swing loads on the bus (20 units/sec, 32 while evasive — though shields at full allocation want 40, and weapons with the turrets armed 42), and it turns a graze into a 40+ damage ram.
-
MISTAKE
Leaving EVASIVE on outside a gunfight. It only reduces direct beam hits — it does nothing against torpedoes, mines, or rocks — while costing 60% more engine power and adding 20 to your signature.
-
MISTAKE
Believing your own throttle lever after a power failure. With ENGINES offline or starved the drive unspools itself at 0.3/sec and your slider drops with it; when Engineering restores power you must re-order the throttle, or the ship just sits there.
-
MISTAKE
Trying to outrun a fight. Torpedoes (95 u/s) outrun every hull, mines (58 u/s) outrun everything but the WREN and SPARROW, and the quicker raiders outrun most of the fleet. The jump drive is the only real escape, and pressing it early costs you the sector's salvage.
▶ CROSS-STATION
WHO YOU TALK TO
No station wins alone. These are the conversations this seat owes the rest of the bridge.
-
TALK TO
Engineering
They fund the ENGINES bus (your actual thrust), spool the jump drive you fire, can overclock the reactor to double your speed, and own the life-support breaker. Your throttle is their largest swing load — 20 units/sec at full, 32 while evasive — so call "going to full burn" or "need overclock" before you do it, and tell them the moment the ENGINES bar goes red.
-
TALK TO
Tactical
They fire the beams (720 units), turrets (420) and torpedoes; you own the range and the geometry that make those shots possible. Your heading also decides which of the four shield arcs soaks each incoming hit — arcs are 90° quadrants, with FORE covering ±45° off the bow — so if Tactical has stacked the forward shield, keep the nose toward the shooter.
-
TALK TO
Science
Scans only progress inside 900 units, so a scan is a flight order: they tell you which contact and you park within range and hold. Their scans are also what reveal a whole minefield and locate enemy subsystems, so refusing to close means flying blind.
-
TALK TO
Comms
Comms can raise anyone on the plot — there is no range gate, the signal-strength bar just reads weaker far out — and Comms owns the alert level, the ship's log, and the intercepted enemy chatter that tells you a rail is charging or reinforcements are coming. Nobody can put a HELM nav card on the TV — that channel does not exist for any client. What you can promote is the parascope view and the star chart, from your own two buttons.
-
TALK TO
Cannoneer (Gunner seats)
They shoot the small fast things — debris, mines, inbound missiles — but only inside 420 units. Give them a stable, predictable pass rather than a wild jink when the sky is full of shrapnel.
-
TALK TO
Captain (a person on the couch, not a station)
They decide fight, talk, or run. You feed them the numbers they can't see: range and bearing to the threat, whether you can still make the objective, and how many seconds you need to be pointed the right way before the jump.
▶ SMALL CREWS
ON A SMALLER SHIP
Helm is a full seat only on the 4-, 5- and 6-crew hulls (VANGUARD, SOVEREIGN, COLOSSUS). On the 2-crew SPARROW and 3-crew TALON it merges with Tactical into the "Pilot-Gunner" seat, and on the 1-crew WREN the single "Shipmaster" chair holds all five duties at once. All of these keep the entire flight cluster intact — the same compass tape, evasive/jump buttons, rail/ECM/flare/chart row, throttle with detents, heading dial, and both the map and fully flyable parascope views (the merged consoles literally reuse the helm's own components). What changes is that nobody else is flying while you shoot, and on the WREN the ship runs auto-officer modules (auto-jamming, a cut-down engineering that auto-vents heat and auto-repairs at a quarter rate) to cover what one pair of hands can't. One important hull note for small crews: the WREN, SPARROW and TALON carry zero point-defense turrets, which is exactly why they carry the biggest flare racks (10, 8 and 9 charges) — as pilot you *are* the ship's point defense.