
▶ Space Couch Command CREW GUIDE // STATION
SCIENCE
Scan the unknown, chart the anomaly, and fly the probe inside.
You are the ship's eyes: you turn anonymous blips into named ships with weak points, you survey the strange things in the sector for salvage and story, and you fly the survey probe when someone has to go inside.
▶ YOUR CONSOLE
WHAT YOU CONTROL
Everything below is on your screen and nobody else's. If you do not say it out loud, it did not happen.
-
CONTROL
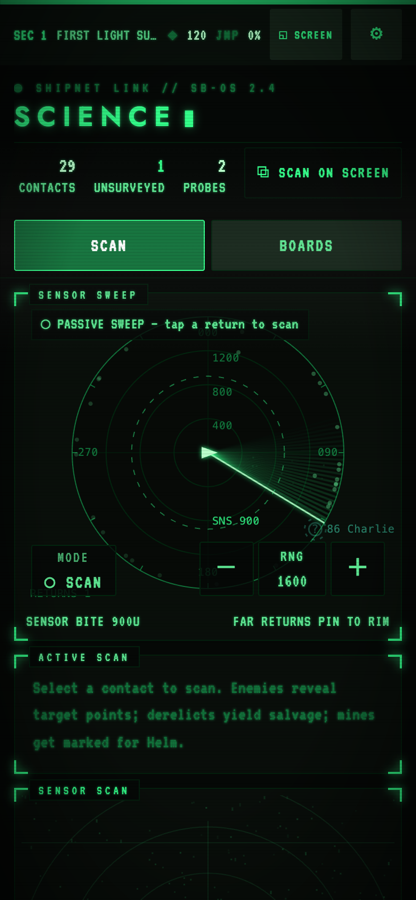
SENSOR SWEEP — a north-up radar dial centred on your ship. Tap any return (hostile, derelict, anomaly, visible mine) to start a deep scan; tap it again to stop. Zoom steps 400 / 800 / 1600 / 3200 / 4800 world units via the −/+ buttons, mouse wheel or two-finger pinch (default 1600). A dashed ring labelled 'SNS' draws your real scanning reach.
-
CONTROL
MODE toggle (bottom-left of the sweep): ○ SCAN ↔ ◉ PLOT. In PLOT, taps no longer scan — you drag to aim a bearing ruler, and whatever you aim at is pushed live to Tactical as a firing solution (bearing, range, suggested torpedo arm delay). Turning PLOT off retracts it.
-
CONTROL
ACTIVE SCAN panel — the live target's name, scan percentage, a STOP button, and the ⚑ TARGET POINTS list: each located enemy subsystem with its own callable designator (e.g. 'Shield Gen — 22 Tango'). It also flags 'jump spool detected' when a hostile is charging an escape jump.
-
CONTROL
SENSOR SCAN scope — the big rotating picture of whatever you last scanned, resolving out of static as the scan climbs. Survey points of interest ride on it as tappable glyphs; selecting one opens an ACTION card with exactly one button: EXTRACT, RETRIEVE, SEND PROBE, DECODE, SAMPLE or TAP.
-
CONTROL
ANOMALY SURVEY board — one card per anomaly with a progress bar, tick marks at the 35% / 70% / 100% milestones, and the lore each milestone unlocks. A SURVEY button starts the deep scan from the card.
-
CONTROL
Triage boards — DERELICT cards (deep scan for salvage), HOSTILES rows (scan each one), MINEFIELD rows with a 'SCAN TO MARK' button, FRIENDLY rows with a hull bar, and the teletype SYSTEM LOG (with a newest-first toggle).
-
CONTROL
'⧉ SCAN ON SCREEN' button in your header — promotes your scope to the shared TV. While a probe mission is live the same button reads '⧉ PROBE ON SCREEN' and pushes the probe feed instead.
-
CONTROL
PROBE PILOT — when a probe mission launches, it replaces the scope in your hero slot: drag anywhere on the glass to fly (release stops), W/S throttle and A/D turn on desktop, one INTERACT button (recover / read / extract), and a press-and-hold ABORT that scuttles the probe after one second.
▶ MOMENT TO MOMENT
THE LOOP
-
STEP 01
Read the sweep. Count the returns, note which are unidentified, and check the dashed SNS ring — that circle is how far your sensors actually bite right now.
-
STEP 02
Pick the highest-value return and tap it. Hostiles first in a fight; derelicts, anomalies and mines when the sky is clear.
-
STEP 03
Watch the ACTIVE SCAN bar and call the reveals out loud the moment they land: the ship class at 35%, then each target point with its designator.
-
STEP 04
If the target is a body with survey points, keep the scan running to 100%, then tap markers on the scope and take their actions — extract, decode, tap, or spend a probe.
-
STEP 05
If the action you take spends a probe, you drop into the probe mission: fly the interior, grab the prize, and get back to the pad alive.
-
STEP 06
Retarget. There is always another return, and an unsurveyed sector is money and story you left on the table.
▶ THE RULES UNDERNEATH
KEY MECHANICS
The numbers here come straight out of the shipping build.
-
MECHANIC
The scan gate: range and power
Base scan range is 900 units, but your EFFECTIVE range is 900 × your SENSORS power ratio (power allocated ÷ power demanded, times the dish's health). There is no floor — a SENSORS system that is offline or unfunded scans NOTHING, and the console goes to pure snow with 'NO POWER TO SENSORS'. Worse, starting a scan raises SENSORS demand from 5 to 15 power units, so the act of scanning can itself starve your ratio and shrink your reach. Full-power scan rate is 0.4 scan-level per second (about 2.5 seconds for a warship); the Deep Scanner unlock multiplies every scan by 1.3.
-
MECHANIC
The reveal ladder
On a hostile, 35% confirms the ship class and 55% / 78% / 100% each locate one target point (subsystem) in order. On a derelict the scan runs at half speed and completes at 100% for salvage plus 2 torpedoes. On a mine the read takes about 1 second — and reading any ONE mine marks the entire field for everybody. Anomalies scan slower still and by type: megastructures ×0.3, planets ×0.35, wrecks ×0.5, organisms ×0.6, phenomena ×0.7, comets ×0.8.
-
MECHANIC
Target points are Tactical's only precision option
Enemy subsystems — Engines, Shield Gen, Weapons, Jump Drive — cannot be targeted until your scan reveals them. Tactical's console literally shows nothing to aim at until you've done the work, and torpedo overflow only routes into a revealed subsystem. Each point carries its own NATO designator ('14 Bravo'), which is what you say on the couch. Killing Shield Gen stops their shield regen; killing Jump Drive stops them escaping; killing Engines strands them.
-
MECHANIC
Survey points of interest (POIs)
Deep-scanning a planet, wreck, megastructure or derelict resolves survey points on the scope. They appear as unresolved glyphs at 35% scan, the first half resolve at 70%, and the rest at 100%. Each kind offers exactly one action: mineral → EXTRACT, signal → DECODE, core → TAP (these three are free), and relic → RETRIEVE, hatch → SEND PROBE, organism → SAMPLE (these three cost a probe). Actions only land within 1350 units of the body; outside that the button greys out. Every point is one-shot.
-
MECHANIC
Probes are finite — and refundable
You start a run with 2 survey probes. Guild merchants sell them 2 at a time for 30 salvage, and you occasionally find one in a cargo pod or a nebula lane. Launching a probe-costing action spends one immediately. But if the probe EXTRACTS successfully it is re-racked and you get it back — a clean mission costs nothing but nerve. If it is caught, wrecked, aborted, or if the ship jumps while it is out, the probe is gone AND the survey point is burned with it. Only one probe can be out at a time.
-
MECHANIC
The probe mission (the interior crawl)
A probe-costing action drops you into a top-down interior on a 24×16 grid. You see a 75° forward cone out to 6.5 tiles plus a 1.6-tile ambient ring — the darkness is the game. Probe hull is 50; arc conduits do 18 damage every 1.6 seconds, vents shove you sideways, and collapse plates fall in 0.7 seconds after you leave them. Noise = 0.08 idle + throttle² × 0.55, and something can hear you from (noise × 14) tiles away — so half throttle is heard ~3 tiles, full throttle ~9. There is a 35% chance something is in there with you on an ordinary roll, and a 100% chance on a trap-family prize. Extraction is a 2.5-second hold on the entry pad; leaving the pad cancels it.
-
MECHANIC
PLOT mode — the firing solution
Flipping the sweep to PLOT turns it into a bearing ruler. Drag and it snaps to any contact within 26 pixels, reporting bearing, range, and a suggested torpedo activation delay. Every drag streams live to Tactical, who sees a '◈ FIRING SOLUTION' bar they can tap to load bearing and delay into their tubes. It retracts automatically the instant you leave PLOT, switch phone tabs away, or your console unmounts — a stale bearing is worse than none.
▶ DO THIS
TIPS FROM THE SIM
-
TIP
Watch the SNS ring, not just the percentage. If a scan sits at 0% with no explanation, it is almost always distance or power. The console tells you which: 'OUT OF SENSOR RANGE — Helm must close to Nu' versus 'NO POWER TO SENSORS — ask Engineering to feed the dish.' Say the number out loud; Helm can act on '400 units' and cannot act on 'it's not working'.
-
TIP
Scanning triples your own power draw (5 → 15). On a tight reactor, ask Engineering to raise SENSORS BEFORE you start a long survey, not after — otherwise your effective range collapses at the exact moment you commit to a target.
-
TIP
Identified contacts stay bright. On the sweep, an identified return holds an echo floor of 0.5 versus 0.1 for an unknown, and it carries its class label. Scanning a hostile permanently improves how every station reads it, even after you retarget.
-
TIP
One mine scan does the whole field. Mines are invisible past 620 units and they actively hunt inside 160 units at 58 u/s — faster than every hull except the WREN and SPARROW — and hit for 75. A single ~1-second scan on any mine marks every mine on every console. Do it the second you enter a minefield, before Helm commits to a heading.
-
TIP
Some sectors are cleared BY you, not by Tactical. A DERELICT sector completes when the hulk hits 100% and no hostiles remain — roughly one derelict in three is a trap that spawns raiders the moment your scan finishes; a MINEFIELD completes when the bait derelict at the centre hits 100%; SURVEY and DEBRIS STORM sectors complete when you fully chart an anomaly. In those sectors your scan bar IS the objective.
-
TIP
A sleeping leviathan is worth more asleep. Fully surveying a dormant leviathan pays 160 salvage for the study; provoking it wakes it and spills broodlings. Likewise the stellar manta dives away at 65 u/s for 7 seconds if anyone shoots near it, taking its payout with it. When you identify one, call GUNS COLD immediately.
-
TIP
Free actions before paid ones. EXTRACT, DECODE and TAP cost nothing but a die roll. Work the free points first; you learn what the body is and bank salvage before you decide whether the sealed hatch is worth your last probe.
-
TIP
Read the log tone. Milestone lore printed in warning colour at 70% is the game telling you the 100% outcome may bite — false transponders, watch-nets and warm precursor cores all announce themselves one beat before they matter.
▶ NOT THIS
COMMON MISTAKES
-
MISTAKE
Scanning from the arrival point and wondering why nothing happens. Sensors only bite inside your effective range, which is often well under 900 units. The anomaly spawn band is 900–1800 units out — you almost always have to ask Helm to close before a survey will start at all.
-
MISTAKE
Leaving PLOT mode on with a stale aim, or leaving it on while you should be scanning. In PLOT, taps no longer start scans — several crews lose a whole fight because Science was 'scanning' on a console that was actually in ruler mode.
-
MISTAKE
Burning a probe on a hatch when you're one jump from leaving. Engaging the jump drive while a probe is out forfeits it instantly with no end card, and the survey point is marked spent anyway. Finish the mission or don't start it.
-
MISTAKE
Going full throttle in the probe interior. Throttle noise is squared: full stick is heard nearly three times further than half stick, and an arc discharge rings the entire site. The probe crosses the map in about 10 seconds flat out — and that speed is exactly what gets it eaten.
-
MISTAKE
Sitting silent. Target-point designators, the scan percentage, the enemy jump-spool warning, and the range Helm needs to close to all live only on your screen. A Science officer who scans perfectly and says nothing is worth less than one who scans carelessly and narrates.
▶ CROSS-STATION
WHO YOU TALK TO
No station wins alone. These are the conversations this seat owes the rest of the bridge.
-
TALK TO
Helm
You cannot scan what you cannot reach. You give Helm the number — 'close to 640 units on 14 Bravo' — and Helm gives you a firing position. Helm also needs your mine markings (mines hunt at 58 u/s and hit for 75), your solid-body warnings (planets, wrecks and megastructures collide; phenomena and organisms don't), and your hazard calls: a collapsed star drags the hull inside 800 units, a neutron beacon lashes everything inside 1500 units every 10 seconds, and a nebula's shroud inside 700 units cuts your signature to 0.45 — a hiding place.
-
TALK TO
Engineering
Your dish runs on their power board. SENSORS demand jumps from 5 to 15 while you scan, and your speed AND range both scale directly with the funded ratio. If SENSORS gets forced offline by an outage, every scan stalls until they finish the reroute puzzle — tell them the moment your scope goes to snow.
-
TALK TO
Tactical
The whole reason to scan a hostile. They cannot select a subsystem until you reveal it, so you read designators to them ('Shield Gen, 22 Tango') and they focus fire. In PLOT mode you also push them a live bearing and range they can load into a torpedo with one tap. Tell them when you retract it.
-
TALK TO
Comms
During a probe mission Comms runs the rotating radar sweep — it is the only way to see the creature, since it never appears in your cone until it's on top of you. Their manual ping charts the whole site but is deliberately LOUD and attracts the thing (18-second cooldown). Agree beforehand: you ask for pings, they don't fire them blind.
-
TALK TO
Captain (the person on the couch)
Your survey findings are decisions, not facts. A sealed hatch, a warm precursor core, a wreck broadcasting a false all-clear — each is a gamble with real downside. Report what the instruments say, recommend, and let the captain call it.
▶ SMALL CREWS
ON A SMALLER SHIP
Science is merged into a combined seat on every hull below the 5-crew cruiser. On the 4-crew VANGUARD and the 3-crew TALON it pairs with Comms as the "Science & Comms" seat, which keeps the full scan loop — sweep, PLOT mode, the SENSOR SCAN scope with POI actions, the anomaly board and the triage lists — but drops the system log (the Comms side carries it). On the 2-crew SPARROW, the "Operations" seat folds Science into Engineering and Comms; it keeps sweep, scope, active scan and the anomaly board but loses the triage lists entirely — you scan by tapping returns on the sweep instead of by tapping rows on a board. On the 1-crew WREN, the Shipmaster seat holds all five duties: the sensor glass becomes one slot you flip between SWEEP, SCAN and PROBE, the anomaly board opens as a slide-over behind a "◈ SURVEYS" button, and an auto-jammer plus slim engineering handle the housekeeping. In every merged form the underlying intents are identical — same scan, same POI actions, same probe. What you lose is elbow room, and on solo you also lose your radar partner: the probe mission's rotating sweep becomes a corner inset on your own glass.